Create Groups for Use in Group Reports
Group Reports are used to create and display articulation agreements ("transfer pathways") and transfer guides between two institutions. Each Group Report is comprised of Groups, which contain equivalencies and optional explanatory text to help convey transfer information to students. These Groups can be reused and combined in any order in other Group Reports. Group Reports dynamically update to reflect changes made to a Group's equivalencies. This article provides instructions for creating Groups.
In this article:
Institutions must store equivalencies in TES to take advantage of Groups and Group Reports.
Groups and Group Reports are created and stored at the institution level in the Equivalency Manager. To navigate there:
- Go to the Match menu.
- Select Equivalency Manager.
All institutions where the user's college or university has established equivalencies will be listed. If a Group was created, a checkmark will appear to the right of the institution name in the GROUPS? column and - if selected - will take the user to the Group(s).
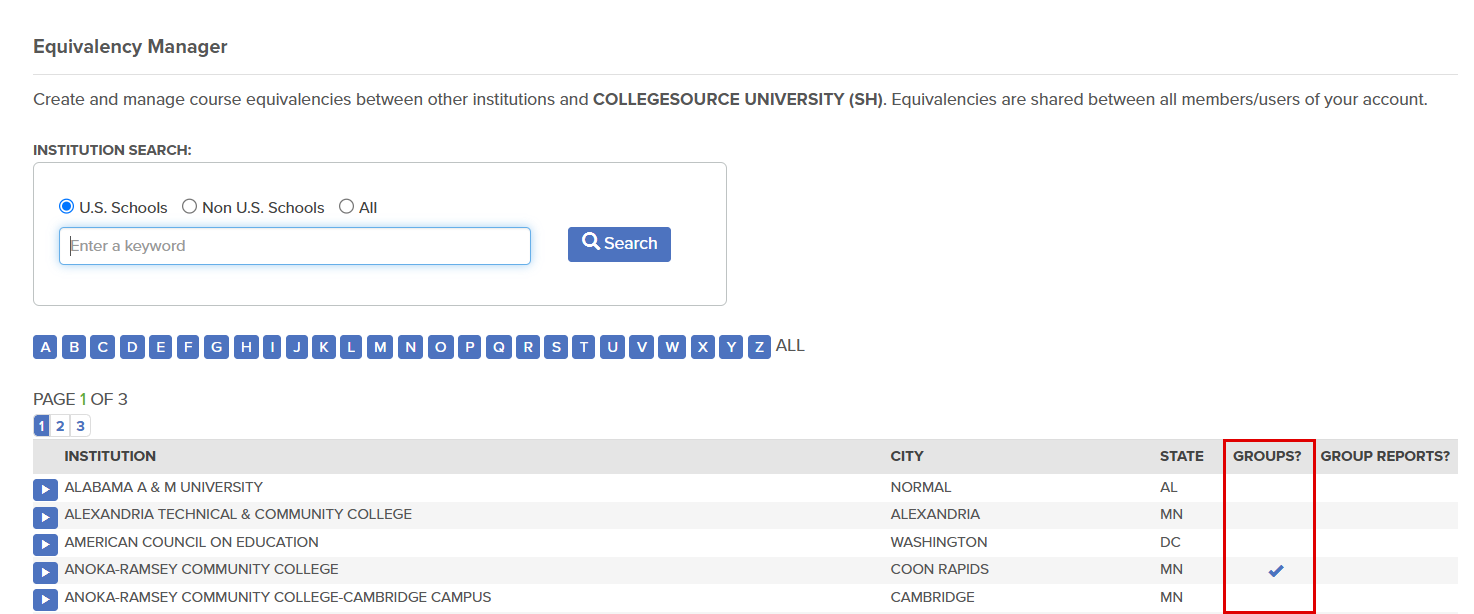
Similarly, a checkmark within the GROUP REPORTS? column indicates that a Group Report exists for that institution, and if selected, it will navigate the user to the reports.
Users can sort by institutions that have established Groups or Group Reports by selecting the named header twice.
Create a Group
To create a Group:
- Select the INSTITUTION name.
- Use the INSTITUTION SEARCH, letter, or page indexes to navigate.
- Equivalencies for the selected institution will appear within a list.
- Select the Groups button.

Any previously created Groups or Group Reports will appear on the Equivalency Groups page.
- Select Add Group.

The ADD EQUIVALENCY GROUP pop-up will display the following fields:

Create a Text-Only Group
Most Groups will contain equivalencies that show prospective students what courses to take at the send institution and what credit the user's school will grant upon transfer. However, institutions may desire to create text-only Groups to convey graduation or admissions requirements to students.
To do so:
- Enter a Group Name.
- Leave the Public View Display? checkbox unmarked (unless the Group should display within the Public View).
- Enter the information to share with students in the Public Note field.

| Field | Description |
| Group Name |
The name of the Group. The name will appear in all uppercase once saved. 255 character limit. |
| Public View Display? |
This checkbox controls the display of the Group within the Public View. The default setting is blank (do not display). The best practice is to hide Groups within the Public View. |
|
Public Note (optional) |
A note within the Group that is used to convey information to students. This note is generally explanatory text explaining or detailing restrictions around the requirement. 1,024 character limit. |
|
Private Note (optional) |
An Internal, administrative note that will not display within the Group Report or the Equivalency Finder. 1,024 character limit. |
|
|
|
Institutions can use Hypertext Markup Language (HTML) to bold, underline, and italicize text and create paragraph breaks in the Public Note. For further information, see HTML Tags for Group and Group Report Customization under Related Articles.
- Select Submit.
The Group will be detailed on the page below. Do not add any equivalencies to the Group.

Create an Equivalency Group
Most Groups will contain equivalencies that show prospective students what courses to take at the send institution and what credit will be granted upon transfer. To create a Group with equivalencies:
- Enter or select the following information.
- At a minimum, a Group Name is required.

| Field | Description |
| Group Name |
The name of the Group. The name will appear in all uppercase once saved. 255 character limit. |
| Public View Display? |
This checkbox controls the display of the Group within the Public View. The default setting is blank (do not display). The best practice is to hide Groups within the Public View. |
|
Public Note (optional) |
A note within the Group that is used to convey information to students. This note is generally explanatory text explaining or detailing restrictions around the requirement. 1,024 character limit. |
|
Private Note (optional) |
An Internal, administrative note that will not display within the Group Report or the Equivalency Finder. 1,024 character limit. |
|
|
|
Institutions can use HTML to bold, underline, and italicize text and create paragraph breaks in the Public Note. For further information, see HTML Tags for Group and Group Report Customization under Related Articles.
- Select Submit.
- Add equivalencies to the Group.
- Use the filters to help locate equivalencies. Hit enter or select the Search button.
- Select the checkbox to the left of the courses to be added.
- Select Add.

As courses are added, they will display under the header:

Clone a Group
Users can speed up creating Groups (and Group Reports) by cloning existing Groups and editing them. This functionality will be beneficial for institutions that want to reuse:
- Equivalencies.
- Text within the Public or Private Notes.
- Custom HTML.
To clone a Group:
- Navigate to the GROUP/REPORT LIST page.
- Choose the Select a group button to the right of the GROUP NAME to be cloned.
The GROUP NAME does not copy into the cloned group. If a Group Name has HTML that needs to be reused, copy the Group Name prior to cloning.

- Select Clone Group.

- Within the CLONE GROUP pop-up:
- Enter the New Course Group Name.
- Select the checkboxes to the left of the equivalencies that should be copied into the new Group. By default, no checkboxes are marked.
- Select the checkbox to the left of the send institution name to add all equivalencies.

- Select Create.
- From here:
- Select Edit Group Header to make adjustments to PUBLIC VIEW DISPLAY? setting, the PUBLIC NOTE, or the PRIVATE NOTE.
- Add courses to the Group using the instructions above.
