Identifying Matching Course Codes through the Equivalency Explorer
Equivalency Explorer reports provide institutions with data that can be used to add, improve, and maintain equivalencies. A user must have the EXPLORE EQ user right to access these reports. The CREATE EQ user right is needed to create equivalencies from reports with this option.
This article will provide an overview of how the Course Code Match report can be used to identify course codes shared between a transfer and home institution. From there, the home school can review the provided data and create an equivalency or equivalencies, if desired.
Overview
The Course Code Match report helps institutions find and research possible course equivalencies by comparing catalogs (data sets) and, from there, producing a list of all the course codes the institutions share. An institution can then review the details of the courses and create equivalencies between one, many, or all courses. This report is intended primarily to be used by institutions within states with common course numbering; however, it can be used by any school to explore potential equivalencies.
Institutions must use discretion in reviewing proposed equivalencies. While this report generates a list of courses with the same code at both the transfer and home institutions, these courses could have different titles, descriptions, differences in credit value, etc. This list is a great starting point from which institutions can determine possible equivalencies, but the data within should be carefully reviewed before creating them.
Equivalency Explorer
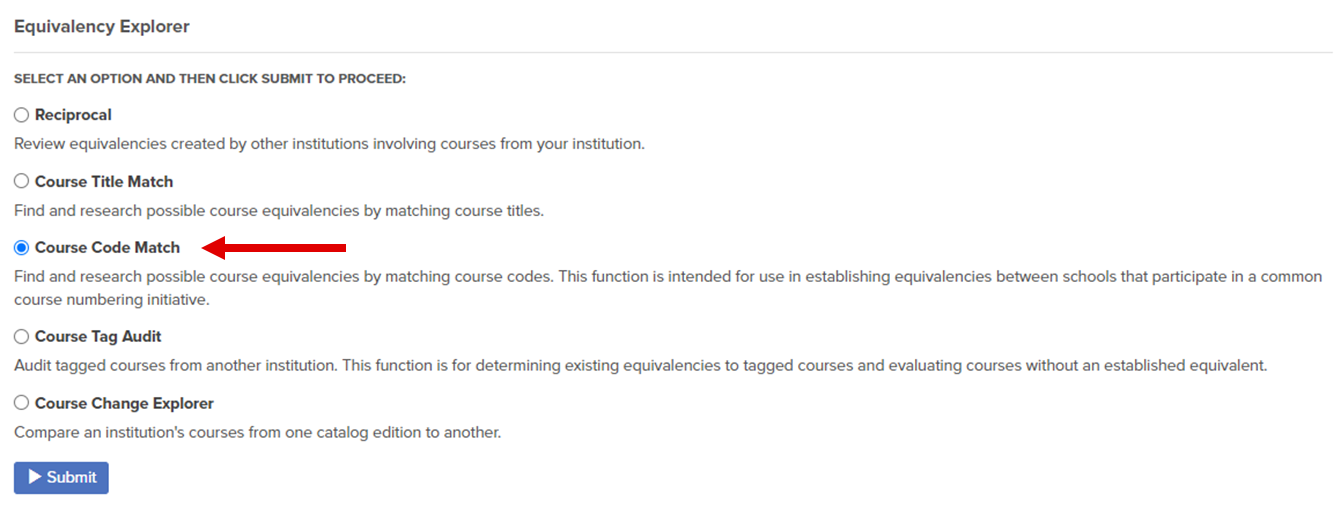
To utilize the Course Code Match report:
1. Go to the Match menu.
2. Select Equivalency Explorer to view 5 listed reports:
- Reciprocal
- Course Title Match
- Course Code Match
- Course Tag Audit
- Course Change Explorer.
3. Select the radio button next to the Course Code Match report.
4. Select Submit.
Find Identical Course Codes
1. Enter the name or a keyword of the institution name in the INSTITUTION SEARCH: box.
- The search is performed, by default, against a list of U.S. Schools.
- To search for a Non U.S. School, toggle the corresponding radio button.
- To search amongst U.S. and Non U.S. Schools, toggle the All radio button.

2. Select Search or press the Enter key.
3. Choose the institution from the list by selecting the arrow button next to its name.
- One or many institution names may appear depending on the specificity of the search criteria.

4. Select the transfer institution data set and the home institution data set that will be compared.

5. Select Submit.

The PROPOSED EQUIVALENCY LIST: identifies all matching course codes. The MATCHING COURSE CODE is displayed on the left, followed by the TRANSFER COURSE TITLE, UNITS, HOME COURSE TITLE, and UNITS.
The IGNORE CHARACTERS (*, -, ~, #, +, /) checkbox is marked by default. When checked, the special characters noted above are ignored in the comparison. This box can be unchecked if special characters should be factored in.
In certain instances, a school may prefer to ignore special characters in a search. For example, suppose a dash separates an institution's course subjects and numbers (e.g., ART-100). In that case, it might be beneficial to ignore special characters; otherwise, ART 100 would not be identified as a matching course code.
The TRANSFER COURSE TITLE and HOME COURSE TITLE can be compared to eliminate potential equivalencies. For example, suppose the transfer course is titled “Art Appreciation” and the home institution course is titled “Drawing I.” In that case, it can be reasonably concluded that the content is not equivalent, and further review is unnecessary.
Preview the Proposed Equivalency
1. Select the arrow icon next to the MATCHING COURSE CODE to preview the details of the proposed equivalency.
The PREVIEW EQUIVALENCY screen displays the details of the transfer course on the left and the home institution course on the right.
2. Review the proposed equivalency.
- Select the X in the top right of the screen to close the window.
Create an Equivalency
Individual or batch equivalencies can be created through the Course Code Match report.
To create one equivalency:
1. Check the box next to the MATCHING COURSE CODE.
2. Select Create.
3. The CREATE EQUIVALENCY screen will appear with a message that “1 equivalency will be created.” Enter the details of the equivalency in the noted fields.
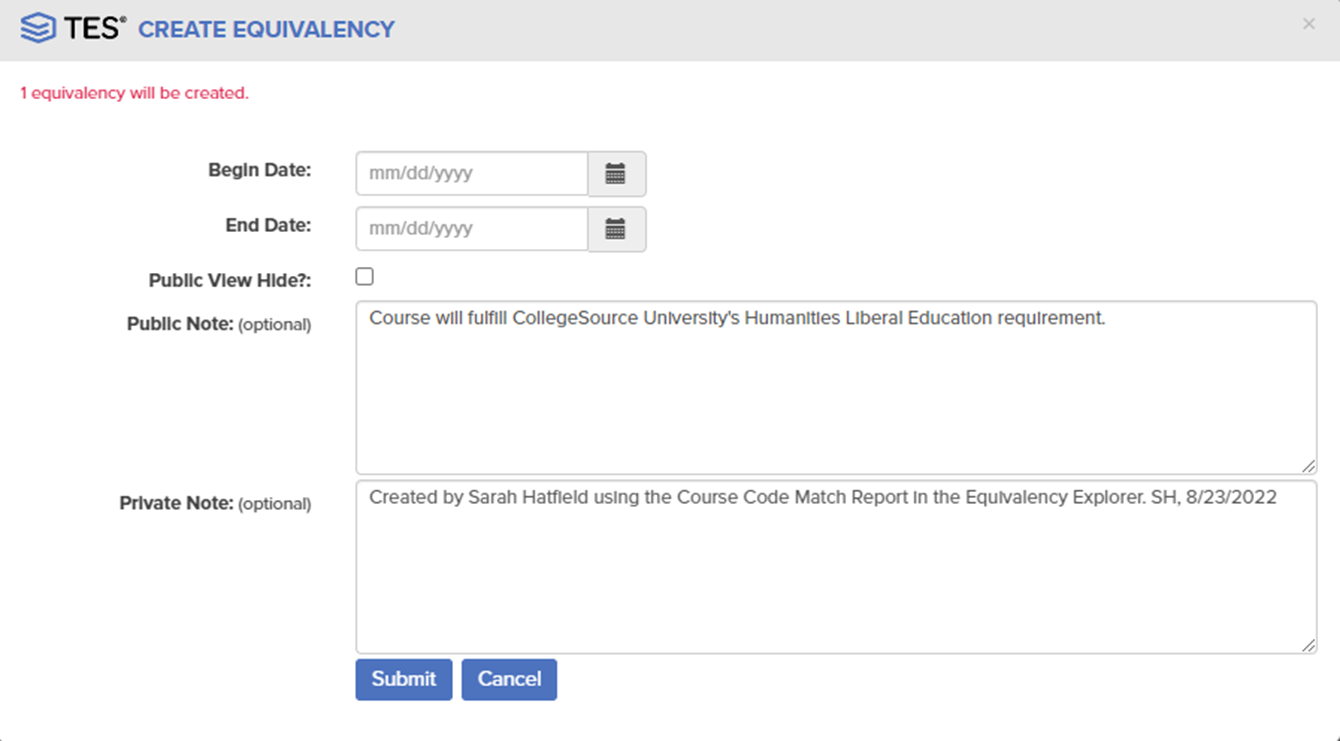
| Begin Date: the first day on which the equivalency is effective
Format: (MM/DD/YYYY) If no Begin Date is entered, the equivalency is considered effective from the "beginning of time" (or at least since the course was created). |
| End Date: the last day on which the equivalency is effective
Format: (MM/DD/YYYY) If no End Date is entered, the equivalency is considered effective into the future. |
| Public View Hide? To hide from the Public View, check the box.
Users without the ACCESS EQ user right will not be able to see the equivalency in the Equivalency Finder. |
| Public Note: (optional) Enter notes to display in the Public View.
|
| Private Note: (optional) Enter notes to document the evaluation process or the
rationale behind the evaluation. Users with the CREATE EQ user right will be able to view Private Notes when reviewing equivalencies in the Equivalency Manager. Users with the ACCESS EQ right can view this information in the Equivalency Finder. |
4. Select Submit.
A message indicates that 1 equivalency was entered into TES between the transfer and home institutions.

From here:
- Select New College to return to the INSTITUTION SEARCH: menu.
- Enter the name of a different institution and begin exploring potential equivalencies with that school.
- Select Review Explorer List to return to the PROPOSED EQUIVALENCY LIST.
- Continue to explore potential equivalencies with the same institution.
- Select View EQ Summary to open the Equivalency Manager.
- Review the details of the equivalency created.
Create Multiple Equivalencies
To create multiple equivalencies in one step:
1. Select the checkbox next to each MATCHING COURSE CODE to which an equivalency should be created.
- If creating many equivalencies, the checkbox at the top of the page can be used to select all the courses on that page. Courses can be unselected by unmarking boxes.
- Select equivalencies on multiple pages using the navigation at the top or bottom of each page. Selected boxes will remain checked when navigating between pages.
2. Select Create.

3. The CREATE EQUIVALENCY screen will appear, indicating the number of equivalencies created.
Enter the details of the equivalency in the noted fields. All information entered will apply to each equivalency.

| Begin Date: the first day on which the equivalency is effective
Format: (MM/DD/YYYY) If no Begin Date is entered, the equivalency is considered effective from the "beginning of time" (or at least since the course was created). |
| End Date: the last day on which the equivalency is effective
Format: (MM/DD/YYYY) If no End Date is entered, the equivalency is considered effective into the future. |
| Public View Hide? To hide from the Public View, check the box.
Users without the ACCESS EQ user right will not be able to see the equivalency in the Equivalency Finder. |
| Public Note: (optional) Enter notes to display in the Public View. |
| Private Note: (optional) Enter notes to document the evaluation process or the
rationale behind the evaluation. Users with the CREATE EQ user right will be able to view Private Notes when reviewing equivalencies in the Equivalency Manager. Users with the ACCESS EQ right can view this information in the Equivalency Finder. |
4. Select Submit.
A message will appear indicating that the number of equivalencies were entered into TES between the transfer and home institutions.

From here:
- Select New College to return to the INSTITUTION SEARCH: menu.
- Enter the name of a different institution and begin exploring potential equivalencies with that school.
- Select Review Explorer List to return to the PROPOSED EQUIVALENCY LIST.
- Continue to explore potential equivalencies with the same institution.
- Select View EQ Summary to open the Equivalency Manager.
- Review the details of the equivalency created.